Tuesday, March 7, 2023

How I Used a Buck Converter to Fix a Voltage Mismatch in My Solar Power Project

I recently bought a DFRobot Solar Power Manager 5V, which is a small and efficient solar power management module designed for 5V solar panels. It can charge a 3.7V Li-ion battery and provide 5V/1A regulated output for various devices such as Arduino, Raspberry Pi, sensors, etc.


However, I ran into a problem when I tried to connect my 9V solar panel to the module. The module has a maximum input voltage of 6V, so it wasn't compatible and could destroy the Solar Power Manager.I needed a way to step down the voltage from 9V to 5V without losing too much power.

That’s when I decided to use a buck converter, which is a type of DC-to-DC converter that can reduce the input voltage while increasing the output current. A buck converter consists of a switch, a diode, an inductor, and a capacitor. By switching the input voltage on and off at a high frequency, the buck converter can control the average voltage across the load.


I bought a buck converter module that can handle up to 36V input and output 1.25V to 32V with a maximum current of 3A. I adjusted the potentiometer on the module to get a 5V output and connected it between the solar panel and the solar power manager. I also added a multimeter to measure the input and output voltages and currents.

The buck converter worked like a charm. It successfully reduced the 9V input to 5V output with a high efficiency of about 90%. The solar power manager was able to charge the battery and power the load without any issues. I was very happy with the result and learned a lot about buck converters and solar power management.

Here are some pictures of my setup:


I hope you enjoyed reading this blog post and found it useful. If you have any questions or comments, please feel free to leave them below. Thanks for reading!


Sunday, March 5, 2023

Why You Should Ditch Your Trouser Pockets And Get A Waist Pouch

I used to put my phone, keys, wallet, and other items in my trouser pockets all the time. I thought it was convenient and easy. But then I realized how bad it was for me and my trousers. Not only did it ruin my trousers by stretching or tearing them, but it also could cause health problems such as back pain, sciatica, or injury. That’s when I decided to ditch my trouser pockets and get a waist pouch instead.

A waist pouch is a small bag that is worn around the waist to carry essentials. It’s useful for running, traveling, or everyday use. Some of the benefits of a waist pouch are:

A waist pouch is not only practical but also stylish. I can find many designs and colors that suit my taste and outfit. I can also adjust it to fit comfortably around my waist.

So what are you waiting for? Ditch your trouser pockets and get a waist pouch today! You will feel more comfortable, confident, and fashionable.


How I customized a hub nut spanner for my Land Rover and saved money

I own a Land Rover Defender and I love working on it myself. One of the tasks that I often do is changing the wheel bearings and hub seals.For this, you need a special tool called a hub nut socket, which is used to remove and tighten the lock nut on the hub bearingsA hub nut socket is a deep impact socket that has a specific size and shape to fit the hub nut. For Land Rovers, the size is usually 52mm. However, buying a hub nut socket can be quite expensive. A new one can cost around £18-£35, depending on the brand and quality.


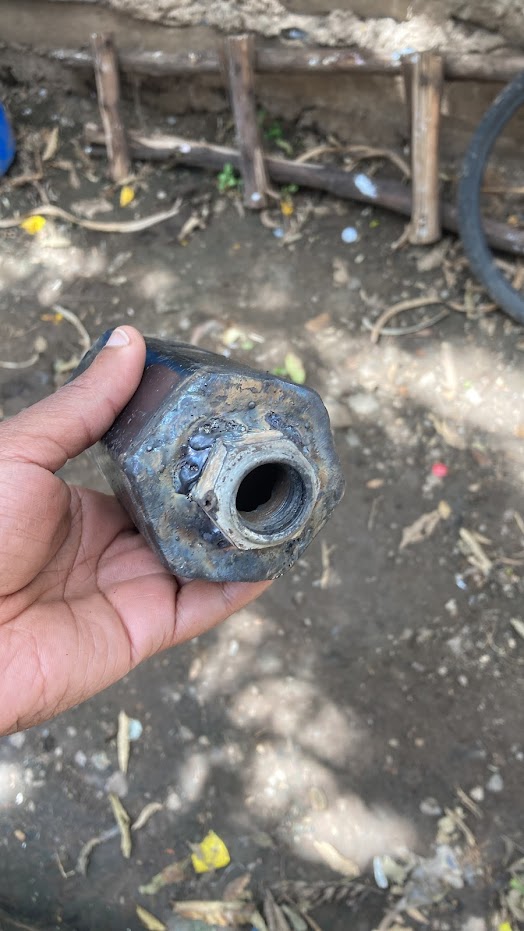
I decided to look for a cheaper alternative and I found one online. It was a hack that involved customizing a hub nut spanner by welding a nut on it. A hub nut spanner is box socket that has two holes that you can fit a metal rod in and the other end goes into the hub nut. It can be used to loosen or tighten the hub nut.It is much cheaper because it's made from a regular pipe which is pressed to meet the hub nut dimensions.


The hack was simple: I bought a cheap hub nut spanner (£5) and a 52mm hexagonal nut (£1). Then, I welded the nut onto one end of the spanner, making sure it was aligned with the side that hold the hub nut. The result was a DIY hub nut socket that could be used with any 1/2 inch drive ratchet or breaker bar.


I tried using my customized tool for changing my wheel bearings and hub seals and it worked perfectly. It fitted snugly onto the hub nut and allowed me to remove and tighten it with ease. It also did not damage or strip the threads of the hub nut or spindle.

I was very pleased with my hack and how it saved me money. I would recommend this hack to anyone who owns a Land Rover and needs to change their wheel bearings and hub seals regularly. It is easy, cheap, and effective.

New favorite tool: the adjustable strap wrench


I have always been interested in DIY projects and handy tools that can make my life easier. Recently, I was browsing AliExpress and I came across the adjustable strap wrench. It looked like a simple tool that could be used for removing oil filters when doing engine service. I decided to order one and see if it was useful.


When I received it, I was impressed by its build quality and design. The adjustable strap wrench is a tool that has a long metal handle and a rubber strap that can be tightened or loosened around different objects. It can grip objects of various shapes and sizes without damaging them. It is also easy to use, you just wrap the strap around the object, adjust the tension with the thumb screw, and turn the handle in the desired direction.

I tried using it for removing oil filters from my car engine and it worked like a charm. The strap wrench gripped the filter firmly and allowed me to unscrew it with minimal effort. It also prevented any oil spills or leaks from the filter. I was very happy with this tool and how it made my engine service easier.

But that was not all. I discovered that the adjustable strap wrench was multipurpose and practical in many situations. For example, I used it for holding shock absorbers when removing them from my Land Rover Defender as they tend to spin. The strap wrench held them securely and prevented them from rotating while I loosened the bottom nut.


I also used it for removing and tightening pipe fittings for plumbing jobs. The strap wrench could fit around pipes of different diameters and materials without scratching or denting them. It also gave me more leverage and control than a regular pipe wrench.

And finally, I used it for removing the caps off jars that were too tight or stuck. The strap wrench could open any jar lid with ease without hurting my hands or breaking the glass. It was a great tool for kitchen tasks as well.


The adjustable strap wrench is now my new favorite tool and for the price on AliExpress, I’d say it’s worth its weight in gold. It is a versatile and handy tool that can be used for many purposes and projects. It saves me time, energy, and frustration while working on different tasks. If you are looking for a useful tool that can do many things, you should try an adjustable strap wrench too.

Choice of suspension parts and quality of ride on a land rover defender 110

 I have always loved driving my Land Rover Defender 300tdi 110, a classic off-road vehicle that can handle any terrain. However, I noticed that the ride was very stiff and uncomfortable when not loaded with cargo or passengers. I wondered if there was something wrong with the suspension parts of my Defender. Here is a video of the action from underneath.


I did some research online and found out that my Defender had double shocks at the rear wheels, which were meant to provide extra stability and support when carrying heavy loads. However, when not loaded, they make the ride harsher and less smooth. I decided to remove one pair of shocks and see if it made any difference.

To my surprise, it did! The ride became much softer and more comfortable without compromising the handling or performance of my Defender. I was happy with this improvement, but I wanted to see if I could make it even better.

I looked for some aftermarket suspension parts that could enhance the ride quality of my Defender. I came across Monroe oil shocks, which are known for their durability and reliability.  I swapped the remaining pair of rear shocks with Monroe shocks and tried driving it while loaded with some heavy stuff.

The ride was surprisingly smooth! The new shocks absorbed the bumps and vibrations effectively and gave me a pleasant driving experience. They also improved the stability and control of my Defender when cornering or braking. I was very impressed by these shocks and how they transformed my Defender. You never know what you're missing, one takeaway from this is that it's difficult to tell when shocks go bad, i had no idea the old ones were that bad.

The next thing I want to try is to remove the heavy duty springs and put on the stock springs which should be softer. Heavy duty springs are meant for off-road use or towing purposes, but they can also make the ride stiffer than necessary. Stock springs are more suitable for normal driving conditions and when you're not carrying a lot of load on your landy.

How I discovered the ESP32 LOLIN C3 Pico and used it to make HTTP requests

 I have always been interested in IoT devices and how they can connect to the internet and communicate with each other. One day, I stumbled upon a website that introduced me to the ESP32 LOLIN C3 Pico, a mini wifi & Bluetooth5 (LE) board based on ESP32-C3FH4, a RISC-V single-core CPU.


I was amazed by its small form factor, which is only 25.4 x 17.8 mm, and its ability to use a lipo battery with 500mA charging. It also has 12 IO pins, 1 WS2812 RGB LED, 1 LOLIN I2C port, and supports ADC, I2C, SPI, UART protocols. It is compatible with MicroPython, Arduino, CircuitPython and ESP-IDF, which means I can program it using different languages and frameworks.

I decided to buy one online and try it out for myself. After receiving it, I followed the instructions on how to install Arduino IDE on my computer and add the ESP32-C3 board support package. Then I wrote some code to connect it to my wifi network and make HTTP requests to a remote server. The code was simple and easy to understand.

I uploaded the code to the board using Arduino IDE and watched the output on the serial monitor. It worked! The board successfully made an HTTP request and printed the response from the server.

I was very happy with my discovery of the ESP32 LOLIN C3 Pico. It is a powerful and versatile board that can be used for many IoT projects. I plan to use it for more applications in the future, such as making an MQTT device or a smart home button.


#include <WiFi.h>
#include <HTTPClient.h>

// Wifi credentials
const char* ssid = "SSID";
const char* password = "PASSWORD";

void setup() {
  // Initialize serial monitor
  Serial.begin(115200);

  // Connect to wifi
  WiFi.begin(ssid, password);
  while (WiFi.status() != WL_CONNECTED) {
    delay(500);
    Serial.print(".");
  }
  
  // Make HTTP request
  HTTPClient http;
  http.begin("http://example.com");
  int httpCode = http.GET();
  
  // Print response
  if (httpCode > 0) {
    String payload = http.getString();
    Serial.println(payload);
  }
  
  // End connection
  http.end();
}

void loop() {
}        

Monday, July 22, 2013

software tools for your raspberry pi

The raspberry pi is a really amazing piece of hardware, any computing enthusiast would really love to have.Just reading the specs makes one think about the many things they can do with it, ideally its a small linux box.

I've compiled a series of tools which i've found useful and which you might want to setup on a raspberry pi

  1. Emacs - well, we also have the vim guys but i won't dive deep into this.Its nice to have your favourite editor handy in the terminal.Remember to place an alias for terminal mode.
  2. Apache - Unless you're serving over 200 concurrent requests, then apache will do.In anycase if you had such a high number of requests then you could afford the heavier guns.
  3. Sqlite3 and/or mysql - sqlite is just brilliant for such devices, i'm surprised it doesn't come out of the box with wheezy.
  4. pip,virtualenv,virtualenvwrapper - the pi means python and these tools go hand in hand with any python development.
  5. Git - Version control in case you want to do some coding on the pi.
Now you are ready to go.Feel free suggest some tools which you found useful and should be added to this list through the comments.